> ## Documentation Index
> Fetch the complete documentation index at: https://checkly-422f444a-mintlify-f27640bd.mintlify.site/llms.txt
> Use this file to discover all available pages before exploring further.
# Webhook Integrations
> Create custom webhook integrations to send Checkly alerts to any API endpoint
**Monitoring as Code**: Learn more about the [Webhook Alert Channel Construct](/constructs/webhook-alert-channel).
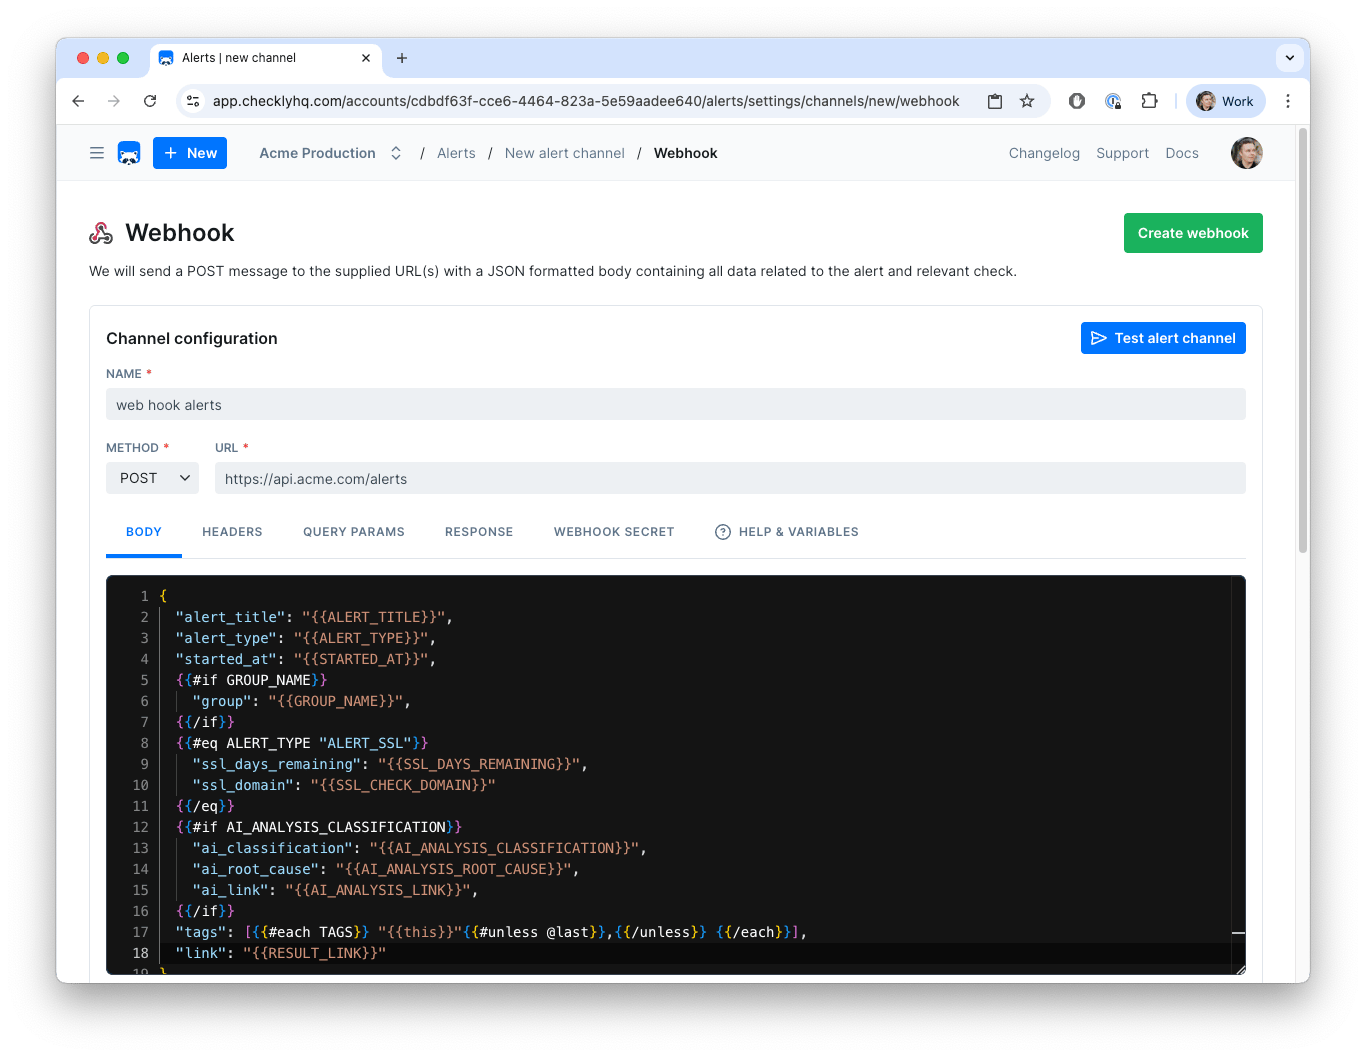 Webhooks allow you to POST custom payloads to any endpoint in your own infrastructure or a third party provider. In a nutshell, you can:
* Create a **custom URL** by adding in authentication tokens or other secrets.
* Create a **custom payload body** using any environment variables and specific instance variables per event. Note: that means that if you are attaching the webhook to a Group, you will be able to access Group-level variables, too.
* **Debug and test the webhook** in the editor by sending test messages.
## Using Variables
The example above shows a webhook configured to create a Jira ticket on each event. Notice the following:
* We use the variable `JIRA_INSTANCE_URL` in the URL. We previously stored this variable in the [environment variables section](https://app.checklyhq.com/environment-variables). Alert-channel configurations accept both [environment variables](/platform/variables) and [secrets](/platform/secrets) using the same `{{NAME}}` syntax.
* We use the variable `CHECK_ID` in the payload. This is one of many event-based variables that will change with each call. See below for the complete list.
In both cases we use the familiar Handlebars templating braces, i.e. `{{ }}` to insert the variable.
To avoid encoding, you can access your environment variables with triple brackets, i.e. `{{{USER_API_KEY}}}`
**Using environment variables and secrets in this channel's config**
Any literal-secret field in this alert channel — webhook URL, API key, bearer token, service key, etc. — accepts a [variable](/platform/variables) or [secret](/platform/secrets) reference using the familiar Handlebars syntax: `{{MY_VARIABLE}}`.
You can also promote a value to a secret directly from the field: type the literal value, click the lock icon next to the input, and choose a name. The value is stored as an encrypted account secret and is never re-displayed in the UI.
You can use the following event-related variables in both URL and payload.
| Variable | Description |
| -------------------------------- | --------------------------------------------------------------------------------------------------------------------------------------------------------------------------------------- |
| `AI_ANALYSIS_CLASSIFICATION` | Classification of the failure / error. Available when Rocky AI automation is enabled. |
| `AI_ANALYSIS_CODE_FIX` | A code fix to resolve the analyzed problem. Available when Rocky AI automation is enabled. |
| `AI_ANALYSIS_LINK` | Direct link to full AI analysis. Available when Rocky AI automation is enabled. |
| `AI_ANALYSIS_ROOT_CAUSE` | Description of possible root cause. Available when Rocky AI automation is enabled. |
| `AI_ANALYSIS_USER_IMPACT` | Description of the user impact. Available when Rocky AI automation is enabled. |
| `ALERT_TITLE` | Human readable title, e.g. 'Check "My API check" has failed' |
| `ALERT_TYPE` | Type of alert, e.g. "ALERT\_FAILURE", "ALERT\_RECOVERY", "ALERT\_DEGRADED", "ALERT\_DEGRADED\_RECOVERY". See [alert states](/communicate/alerts/overview#alert-states) for all options. |
| `API_CHECK_RESPONSE_STATUS_CODE` | The response status code, e.g. 200. Only populated for API checks. |
| `API_CHECK_RESPONSE_STATUS_TEXT` | The response status text, e.g. "OK". Only populated for API checks. |
| `CHECK_ERROR_MESSAGE` | The check error message |
| `CHECK_ID` | The UUID of the check |
| `CHECK_DESCRIPTION` | The description of the check, if set |
| `CHECK_NAME` | Full name of the check |
| `CHECK_RESULT_ID` | The UUID of the result that triggered this message |
| `CHECK_TYPE` | The check type, e.g. API, BROWSER . |
| `GROUP_NAME` | The name of the group, if the check belongs to one. |
| `IS_REMINDER` | Whether this alert is a reminder (`true`) or the initial alert (`false`). |
| `REGION` | Region code where check ran, e.g. "us-east-1" |
| `REMINDER_SEQUENCE` | The reminder number (`0` for initial alerts, `1`+ for reminders). |
| `RESPONSE_TIME` | The reported response time for this result |
| `RESULT_LINK` | The full link to the check result |
| `RUN_LOCATION` | The location where the check ran, i.e. "N. California" |
| `SSL_CHECK_DOMAIN` | The domain of the SSL certificate. For ALERT\_SSL only. |
| `SSL_DAYS_REMAINING` | How many days remain on the SSL certificate. For ALERT\_SSL only. |
| `STARTED_AT` | The ISO timestamp from when this check run started |
| `TAGS` | An array of tags assigned to the check. Have a look at our Opsgenie example below on how to render this to a JSON array. |
### Using AI analysis data in alerts
When [automatic Rocky AI analysis](/resolve/ai-root-cause-analysis/overview#automatic-analysis) is enabled, you can include AI-generated root cause and user impact data in your webhook payloads. Use `{{#if}}` guards so the payload works whether AI analysis data is available or not.
```json theme={null}
{
"message": "{{ALERT_TITLE}}",
"link": "{{RESULT_LINK}}",
{{#if AI_ANALYSIS_ROOT_CAUSE}}
"root_cause": "{{AI_ANALYSIS_ROOT_CAUSE}}",
{{/if}}
{{#if AI_ANALYSIS_USER_IMPACT}}
"user_impact": "{{AI_ANALYSIS_USER_IMPACT}}",
{{/if}}
{{#if AI_ANALYSIS_LINK}}
"ai_analysis_link": "{{AI_ANALYSIS_LINK}}",
{{/if}}
"classification": "{{AI_ANALYSIS_CLASSIFICATION}}"
}
```
### Handlebars Helpers
Webhook templates support [Handlebars built-in helpers](https://handlebarsjs.com/guide/builtin-helpers.html), such as `if`, `unless`, and `each`, as well as these Checkly helpers:
| Helper | Example | Description |
| ---------------- | ------------------------------------ | ------------------------------------------------------------------------------------------------------------------------------------ |
| `$UUID` | `{{$UUID}}` | Generates a random UUID v4, such as `9b1deb4d-3b7d-4bad-9bdd-2b0d7b3dcb6d`. |
| `$RANDOM_NUMBER` | `{{$RANDOM_NUMBER}}` | Generates a random integer from 0 through 10,000. |
| `tagValue` | `{{tagValue TAGS "team" "UNKNOWN"}}` | Returns the value from the first matching `team:value` or `team=value` tag. Returns the optional final argument when no tag matches. |
| `startsWith` | `{{startsWith value "prefix:"}}` | Returns whether a string starts with the supplied prefix. |
| `replace` | `{{replace value "old" "new"}}` | Replaces the first matching string. |
| `split` | `{{split "a,b,c" "," 1}}` | Splits a string and returns the item at the supplied zero-based index. |
| `year` | `{{year}}` or `{{year 2}}` | Returns the current year with four or two digits. |
| `date`, `moment` | `{{date "YYYY-MM-DD"}}` | Formats the current date. The two helper names are aliases. |
#### Get a value from a tag
Use `tagValue` when your tags store key-value metadata. Given these tags:
```text theme={null}
team:payments
environment=production
```
This template:
```handlebars theme={null}
{{tagValue TAGS "team" "UNKNOWN"}}
```
renders `payments`. Both `:` and `=` separators are supported. If neither `team:...` nor `team=...` exists, the template renders the fallback `UNKNOWN`. If multiple tags match, Checkly returns the first one.
Send a test message from the webhook editor to inspect the rendered request before saving your alert channel.
#### Format dates and times
The `date` and `moment` helpers support [Day.js-compatible format tokens](https://day.js.org/docs/en/display/format). You can format the current time, an absolute date, or relative phrases such as `yesterday`, `2 days ago`, and `last week`.
* `{{date "YYYY-MM-DD"}}` formats the current date, for example as `2026-07-24`.
* `{{date "2026-07-24" "MMMM DD, YYYY"}}` renders `July 24, 2026`.
* `{{moment "2 days ago" "YYYY-MM-DD"}}` formats the date from two days ago.
* `{{moment "last week" "X"}}` formats last week as a Unix timestamp.
#### Compare values
Use comparison helpers as blocks or subexpressions where applicable. Available helpers include:
* Equality and ordering: `eq`, `is`, `isnt`, `gt`, `gte`, `lt`, `lte`, and `compare`.
* Boolean logic: `and`, `or`, `not`, `neither`, `isTruthy`, and `isFalsey`.
* Value checks: `contains`, `has`, and `default`.
* Numeric conditions: `ifEven`, `ifOdd`, and `ifNth`.
* Inverse comparisons: `unlessEq`, `unlessGt`, `unlessGteq`, `unlessLt`, and `unlessLteq`.
For example:
```json theme={null}
{
"message": "Check is {{#eq ALERT_TYPE 'ALERT_FAILURE'}}DOWN{{/eq}} {{#eq ALERT_TYPE 'ALERT_RECOVERY'}}UP{{/eq}}"
}
```
The above webhook body uses the `{{#eq}}` helper to execute the logic
*If the ALERT\_TYPE variable equals 'ALERT\_FAILURE', print 'DOWN', if it equals 'ALERT\_RECOVERY' print 'UP'*
So in the case of a failure event, the body would render to:
```json theme={null}
{
"message": "Check is DOWN"
}
```
Two clear benefits here:
* You only need to create one webhook to inform a 3rd party system.
* You can translate Checkly terms to your 3rd party tool's term for the same concept, i.e. the "up status" of a check.
## Webhook Secrets
You can validate each webhook we deliver to your endpoint(s). Using the optional webhook secret, you can:
1. Check if the webhook was sent by Checkly.
2. Check if the payload was not altered in any way during transmission.
When you create a webhook secret, we proceed to use that secret token to cryptographically sign the webhook payload using the SHA256 hash algorithm. We add the resulting hash to the HTTP header `x-checkly-signature` on each webhook.
On the receiving end, you can then use the value of the `x-checkly-signature` header to assert the validity and authenticity of the webhook and its payload.
Have a look at the code examples below on how to use the header and your favourite web framework.
```javascript Node.js theme={null}
// We store the webhook secret in an environment variable called CHECKLY_WEBHOOK_SECRET
const app = require('express')();
const bodyParser = require('body-parser');
const crypto = require('crypto');
function isVerifiedPayload (payload, signature) {
const secret = process.env.CHECKLY_WEBHOOK_SECRET
const hmac = crypto.createHmac('sha256', secret)
const digest = hmac.update(payload).digest('hex')
return crypto.timingSafeEqual(Buffer.from(digest), Buffer.from(signature))
}
app.post('/webhook', bodyParser.json({ type: 'application/json' }), (request, response) => {
const signature = request.headers['x-checkly-signature'];
const payload = JSON.stringify(request.body)
if (isVerifiedPayload(payload, signature)) {
console.log('Signature is valid')
response.status(200).send();
} else {
console.error('Signature does not match')
response.status(400).send();
}
});
app.listen(4242, () => console.log('Running on port 4242'))
```
```ruby Ruby theme={null}
# We store the webhook secret in an environment variable called CHECKLY_WEBHOOK_SECRET
require 'sinatra'
set :port, 4242
post '/webhook' do
signature = request.env['HTTP_X_CHECKLY_SIGNATURE']
payload = request.body.read
digest = OpenSSL::HMAC.hexdigest(OpenSSL::Digest.new('sha256'), ENV['CHECKLY_WEBHOOK_SECRET'], payload)
if Rack::Utils.secure_compare(digest, signature)
status 200
return
else
status 400
return
end
end
```
```python Python theme={null}
# This example assumes you use Django
import hmac
from hashlib import sha256
from django.conf import settings
from django.http import HttpResponse, HttpResponseBadRequest
from django.views.decorators.csrf import csrf_exempt
from django.utils.encoding import force_bytes
import json
@csrf_exempt
def webhook(request):
signature = request.META.get('HTTP_X_CHECKLY_SIGNATURE')
mac = hmac.new(settings.CHECKLY_WEBHOOK_SECRET.encode('utf-8'), msg=request.body, digestmod=sha256)
print(mac.hexdigest())
if not hmac.compare_digest(mac.hexdigest(), signature):
return HttpResponseBadRequest()
return HttpResponse()
```
## Webhook Retries
Checkly will retry your webhook up to **5 times** if we get an HTTP response higher than 399, e.g. a 404 or 503. Each retry is backed off 20 seconds for a total retry period of `5 * 20 = 100 seconds`.
This means that for checks on a 1 minute schedule, there is a potential overlap between a failure alert and recovery alert. For this reason every webhook we send has a timestamp in the `x-checkly-timestamp` header. You can use this timestamp on the receiving end to ignore any webhooks that come in "late".
## Webhook Examples
The following examples give an idea how to integrate Checkly with 3rd party alerting and issue tracking systems.
### OpsGenie and Jira Service Management (JSM) Operations
Checkly does not ship a dedicated JSM Operations alert channel. Because JSM Operations is built on the OpsGenie alerts API, the same webhook pattern shown below works for both. Point the webhook URL at your JSM Operations alerts endpoint instead of the OpsGenie one, keep the payload as-is, and authenticate with the API key issued by JSM.
You can create an OpsGenie
alert by POST-ing the following body
```json theme={null}
{
"message": "{{ALERT_TITLE}}",
"description": "{{ALERT_TYPE}}
Webhooks allow you to POST custom payloads to any endpoint in your own infrastructure or a third party provider. In a nutshell, you can:
* Create a **custom URL** by adding in authentication tokens or other secrets.
* Create a **custom payload body** using any environment variables and specific instance variables per event. Note: that means that if you are attaching the webhook to a Group, you will be able to access Group-level variables, too.
* **Debug and test the webhook** in the editor by sending test messages.
## Using Variables
The example above shows a webhook configured to create a Jira ticket on each event. Notice the following:
* We use the variable `JIRA_INSTANCE_URL` in the URL. We previously stored this variable in the [environment variables section](https://app.checklyhq.com/environment-variables). Alert-channel configurations accept both [environment variables](/platform/variables) and [secrets](/platform/secrets) using the same `{{NAME}}` syntax.
* We use the variable `CHECK_ID` in the payload. This is one of many event-based variables that will change with each call. See below for the complete list.
In both cases we use the familiar Handlebars templating braces, i.e. `{{ }}` to insert the variable.
To avoid encoding, you can access your environment variables with triple brackets, i.e. `{{{USER_API_KEY}}}`
**Using environment variables and secrets in this channel's config**
Any literal-secret field in this alert channel — webhook URL, API key, bearer token, service key, etc. — accepts a [variable](/platform/variables) or [secret](/platform/secrets) reference using the familiar Handlebars syntax: `{{MY_VARIABLE}}`.
You can also promote a value to a secret directly from the field: type the literal value, click the lock icon next to the input, and choose a name. The value is stored as an encrypted account secret and is never re-displayed in the UI.
You can use the following event-related variables in both URL and payload.
| Variable | Description |
| -------------------------------- | --------------------------------------------------------------------------------------------------------------------------------------------------------------------------------------- |
| `AI_ANALYSIS_CLASSIFICATION` | Classification of the failure / error. Available when Rocky AI automation is enabled. |
| `AI_ANALYSIS_CODE_FIX` | A code fix to resolve the analyzed problem. Available when Rocky AI automation is enabled. |
| `AI_ANALYSIS_LINK` | Direct link to full AI analysis. Available when Rocky AI automation is enabled. |
| `AI_ANALYSIS_ROOT_CAUSE` | Description of possible root cause. Available when Rocky AI automation is enabled. |
| `AI_ANALYSIS_USER_IMPACT` | Description of the user impact. Available when Rocky AI automation is enabled. |
| `ALERT_TITLE` | Human readable title, e.g. 'Check "My API check" has failed' |
| `ALERT_TYPE` | Type of alert, e.g. "ALERT\_FAILURE", "ALERT\_RECOVERY", "ALERT\_DEGRADED", "ALERT\_DEGRADED\_RECOVERY". See [alert states](/communicate/alerts/overview#alert-states) for all options. |
| `API_CHECK_RESPONSE_STATUS_CODE` | The response status code, e.g. 200. Only populated for API checks. |
| `API_CHECK_RESPONSE_STATUS_TEXT` | The response status text, e.g. "OK". Only populated for API checks. |
| `CHECK_ERROR_MESSAGE` | The check error message |
| `CHECK_ID` | The UUID of the check |
| `CHECK_DESCRIPTION` | The description of the check, if set |
| `CHECK_NAME` | Full name of the check |
| `CHECK_RESULT_ID` | The UUID of the result that triggered this message |
| `CHECK_TYPE` | The check type, e.g. API, BROWSER . |
| `GROUP_NAME` | The name of the group, if the check belongs to one. |
| `IS_REMINDER` | Whether this alert is a reminder (`true`) or the initial alert (`false`). |
| `REGION` | Region code where check ran, e.g. "us-east-1" |
| `REMINDER_SEQUENCE` | The reminder number (`0` for initial alerts, `1`+ for reminders). |
| `RESPONSE_TIME` | The reported response time for this result |
| `RESULT_LINK` | The full link to the check result |
| `RUN_LOCATION` | The location where the check ran, i.e. "N. California" |
| `SSL_CHECK_DOMAIN` | The domain of the SSL certificate. For ALERT\_SSL only. |
| `SSL_DAYS_REMAINING` | How many days remain on the SSL certificate. For ALERT\_SSL only. |
| `STARTED_AT` | The ISO timestamp from when this check run started |
| `TAGS` | An array of tags assigned to the check. Have a look at our Opsgenie example below on how to render this to a JSON array. |
### Using AI analysis data in alerts
When [automatic Rocky AI analysis](/resolve/ai-root-cause-analysis/overview#automatic-analysis) is enabled, you can include AI-generated root cause and user impact data in your webhook payloads. Use `{{#if}}` guards so the payload works whether AI analysis data is available or not.
```json theme={null}
{
"message": "{{ALERT_TITLE}}",
"link": "{{RESULT_LINK}}",
{{#if AI_ANALYSIS_ROOT_CAUSE}}
"root_cause": "{{AI_ANALYSIS_ROOT_CAUSE}}",
{{/if}}
{{#if AI_ANALYSIS_USER_IMPACT}}
"user_impact": "{{AI_ANALYSIS_USER_IMPACT}}",
{{/if}}
{{#if AI_ANALYSIS_LINK}}
"ai_analysis_link": "{{AI_ANALYSIS_LINK}}",
{{/if}}
"classification": "{{AI_ANALYSIS_CLASSIFICATION}}"
}
```
### Handlebars Helpers
Webhook templates support [Handlebars built-in helpers](https://handlebarsjs.com/guide/builtin-helpers.html), such as `if`, `unless`, and `each`, as well as these Checkly helpers:
| Helper | Example | Description |
| ---------------- | ------------------------------------ | ------------------------------------------------------------------------------------------------------------------------------------ |
| `$UUID` | `{{$UUID}}` | Generates a random UUID v4, such as `9b1deb4d-3b7d-4bad-9bdd-2b0d7b3dcb6d`. |
| `$RANDOM_NUMBER` | `{{$RANDOM_NUMBER}}` | Generates a random integer from 0 through 10,000. |
| `tagValue` | `{{tagValue TAGS "team" "UNKNOWN"}}` | Returns the value from the first matching `team:value` or `team=value` tag. Returns the optional final argument when no tag matches. |
| `startsWith` | `{{startsWith value "prefix:"}}` | Returns whether a string starts with the supplied prefix. |
| `replace` | `{{replace value "old" "new"}}` | Replaces the first matching string. |
| `split` | `{{split "a,b,c" "," 1}}` | Splits a string and returns the item at the supplied zero-based index. |
| `year` | `{{year}}` or `{{year 2}}` | Returns the current year with four or two digits. |
| `date`, `moment` | `{{date "YYYY-MM-DD"}}` | Formats the current date. The two helper names are aliases. |
#### Get a value from a tag
Use `tagValue` when your tags store key-value metadata. Given these tags:
```text theme={null}
team:payments
environment=production
```
This template:
```handlebars theme={null}
{{tagValue TAGS "team" "UNKNOWN"}}
```
renders `payments`. Both `:` and `=` separators are supported. If neither `team:...` nor `team=...` exists, the template renders the fallback `UNKNOWN`. If multiple tags match, Checkly returns the first one.
Send a test message from the webhook editor to inspect the rendered request before saving your alert channel.
#### Format dates and times
The `date` and `moment` helpers support [Day.js-compatible format tokens](https://day.js.org/docs/en/display/format). You can format the current time, an absolute date, or relative phrases such as `yesterday`, `2 days ago`, and `last week`.
* `{{date "YYYY-MM-DD"}}` formats the current date, for example as `2026-07-24`.
* `{{date "2026-07-24" "MMMM DD, YYYY"}}` renders `July 24, 2026`.
* `{{moment "2 days ago" "YYYY-MM-DD"}}` formats the date from two days ago.
* `{{moment "last week" "X"}}` formats last week as a Unix timestamp.
#### Compare values
Use comparison helpers as blocks or subexpressions where applicable. Available helpers include:
* Equality and ordering: `eq`, `is`, `isnt`, `gt`, `gte`, `lt`, `lte`, and `compare`.
* Boolean logic: `and`, `or`, `not`, `neither`, `isTruthy`, and `isFalsey`.
* Value checks: `contains`, `has`, and `default`.
* Numeric conditions: `ifEven`, `ifOdd`, and `ifNth`.
* Inverse comparisons: `unlessEq`, `unlessGt`, `unlessGteq`, `unlessLt`, and `unlessLteq`.
For example:
```json theme={null}
{
"message": "Check is {{#eq ALERT_TYPE 'ALERT_FAILURE'}}DOWN{{/eq}} {{#eq ALERT_TYPE 'ALERT_RECOVERY'}}UP{{/eq}}"
}
```
The above webhook body uses the `{{#eq}}` helper to execute the logic
*If the ALERT\_TYPE variable equals 'ALERT\_FAILURE', print 'DOWN', if it equals 'ALERT\_RECOVERY' print 'UP'*
So in the case of a failure event, the body would render to:
```json theme={null}
{
"message": "Check is DOWN"
}
```
Two clear benefits here:
* You only need to create one webhook to inform a 3rd party system.
* You can translate Checkly terms to your 3rd party tool's term for the same concept, i.e. the "up status" of a check.
## Webhook Secrets
You can validate each webhook we deliver to your endpoint(s). Using the optional webhook secret, you can:
1. Check if the webhook was sent by Checkly.
2. Check if the payload was not altered in any way during transmission.
When you create a webhook secret, we proceed to use that secret token to cryptographically sign the webhook payload using the SHA256 hash algorithm. We add the resulting hash to the HTTP header `x-checkly-signature` on each webhook.
On the receiving end, you can then use the value of the `x-checkly-signature` header to assert the validity and authenticity of the webhook and its payload.
Have a look at the code examples below on how to use the header and your favourite web framework.
```javascript Node.js theme={null}
// We store the webhook secret in an environment variable called CHECKLY_WEBHOOK_SECRET
const app = require('express')();
const bodyParser = require('body-parser');
const crypto = require('crypto');
function isVerifiedPayload (payload, signature) {
const secret = process.env.CHECKLY_WEBHOOK_SECRET
const hmac = crypto.createHmac('sha256', secret)
const digest = hmac.update(payload).digest('hex')
return crypto.timingSafeEqual(Buffer.from(digest), Buffer.from(signature))
}
app.post('/webhook', bodyParser.json({ type: 'application/json' }), (request, response) => {
const signature = request.headers['x-checkly-signature'];
const payload = JSON.stringify(request.body)
if (isVerifiedPayload(payload, signature)) {
console.log('Signature is valid')
response.status(200).send();
} else {
console.error('Signature does not match')
response.status(400).send();
}
});
app.listen(4242, () => console.log('Running on port 4242'))
```
```ruby Ruby theme={null}
# We store the webhook secret in an environment variable called CHECKLY_WEBHOOK_SECRET
require 'sinatra'
set :port, 4242
post '/webhook' do
signature = request.env['HTTP_X_CHECKLY_SIGNATURE']
payload = request.body.read
digest = OpenSSL::HMAC.hexdigest(OpenSSL::Digest.new('sha256'), ENV['CHECKLY_WEBHOOK_SECRET'], payload)
if Rack::Utils.secure_compare(digest, signature)
status 200
return
else
status 400
return
end
end
```
```python Python theme={null}
# This example assumes you use Django
import hmac
from hashlib import sha256
from django.conf import settings
from django.http import HttpResponse, HttpResponseBadRequest
from django.views.decorators.csrf import csrf_exempt
from django.utils.encoding import force_bytes
import json
@csrf_exempt
def webhook(request):
signature = request.META.get('HTTP_X_CHECKLY_SIGNATURE')
mac = hmac.new(settings.CHECKLY_WEBHOOK_SECRET.encode('utf-8'), msg=request.body, digestmod=sha256)
print(mac.hexdigest())
if not hmac.compare_digest(mac.hexdigest(), signature):
return HttpResponseBadRequest()
return HttpResponse()
```
## Webhook Retries
Checkly will retry your webhook up to **5 times** if we get an HTTP response higher than 399, e.g. a 404 or 503. Each retry is backed off 20 seconds for a total retry period of `5 * 20 = 100 seconds`.
This means that for checks on a 1 minute schedule, there is a potential overlap between a failure alert and recovery alert. For this reason every webhook we send has a timestamp in the `x-checkly-timestamp` header. You can use this timestamp on the receiving end to ignore any webhooks that come in "late".
## Webhook Examples
The following examples give an idea how to integrate Checkly with 3rd party alerting and issue tracking systems.
### OpsGenie and Jira Service Management (JSM) Operations
Checkly does not ship a dedicated JSM Operations alert channel. Because JSM Operations is built on the OpsGenie alerts API, the same webhook pattern shown below works for both. Point the webhook URL at your JSM Operations alerts endpoint instead of the OpsGenie one, keep the payload as-is, and authenticate with the API key issued by JSM.
You can create an OpsGenie
alert by POST-ing the following body
```json theme={null}
{
"message": "{{ALERT_TITLE}}",
"description": "{{ALERT_TYPE}}
{{STARTED_AT}} ({{RESPONSE_TIME}}ms)
{{RESULT_LINK}}",
"tags": [{{#each TAGS}} "{{this}}" {{#unless @last}},{{/unless}} {{/each}}]
}
```
to the OpsGenie `alerts` API endpoint
```
https://{{OPSGENIE_API_KEY}}@api.opsgenie.com/v2/alerts
```
Or you can add the OpsGenie API key in the headers, e.g.
```
Authorization: GenieKey {{OPSGENIE_API_KEY}}
```
This is an example of a full alert body:
```json theme={null}
{
"message": "{{ALERT_TITLE}}",
"description": "{{ALERT_TYPE}}: {{CHECK_NAME}}
{{STARTED_AT}} ({{RESPONSE_TIME}}ms)
{{RESULT_LINK}}",
"responders": [
{
"id":"4513b7ea-3b91-438f-b7e4-e3e54af9147c",
"type":"team"
}
],
"tags": ["Critical", "Production"],
"priority":"P1",
"note": "Location: {{RUN_LOCATION}}"
}
```
In case you would like different teams to be responsible for different Check Groups, you could add a `CHECK_GROUP_TEAM` variable with a different value for each Group, then modify the above snippet with the following:
```json theme={null}
"responders": [
{
"id":"{{CHECK_GROUP_TEAM}}",
"type":"team"
}
]
```
### PagerDuty
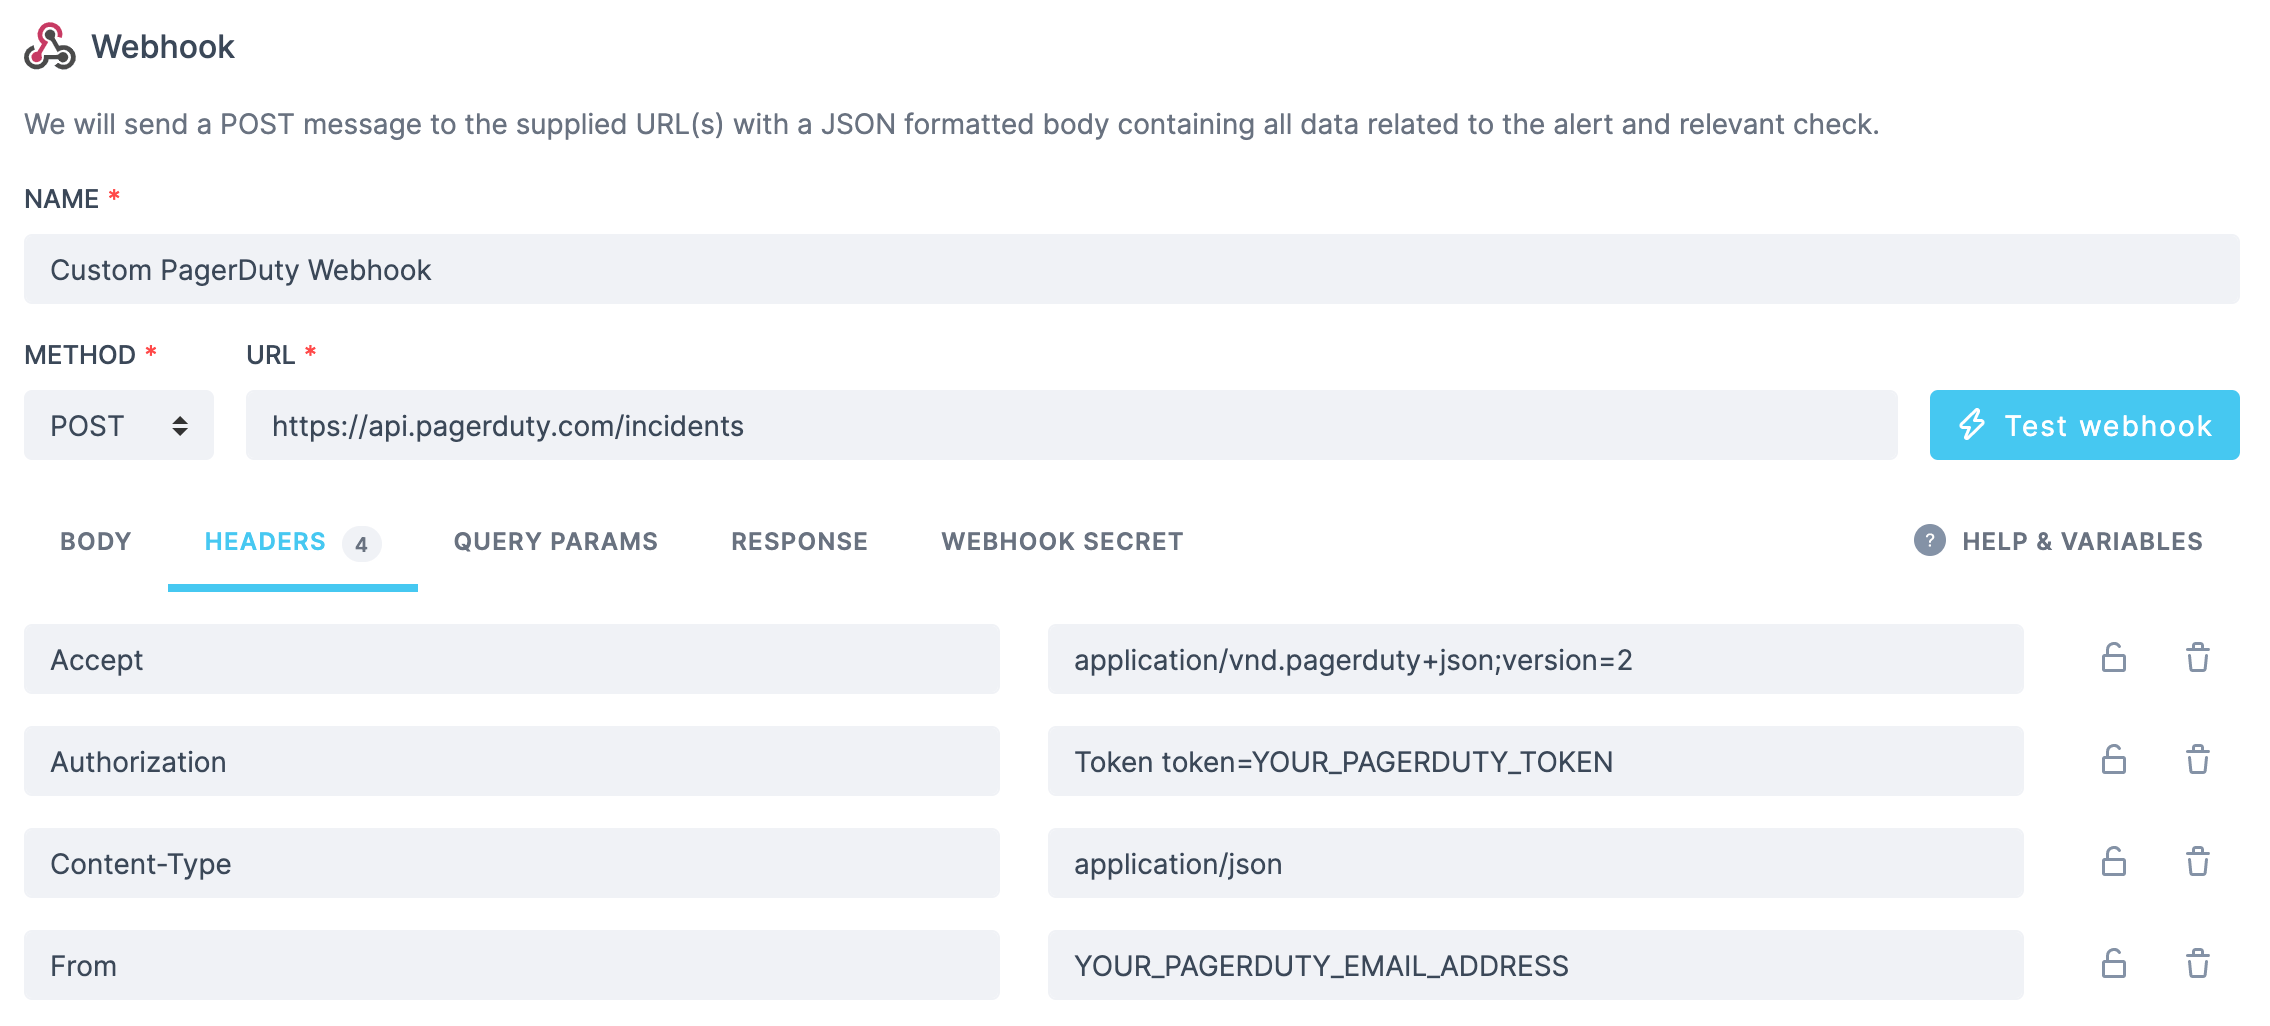
Given an existing service on your PagerDuty account, create an incident for it by posting the following body
```json theme={null}
{
"incident": {
"type": "incident",
"title": "{{ALERT_TITLE}}",
"service": {
"id": "",
"type": "service_reference"
},
"body": {
"type": "incident_body",
"details": "Check {{CHECK_NAME}} with ID {{CHECK_ID}} has failed from location {{RUN_LOCATION}}. See check result for details: {{RESULT_LINK}}"
}
}
}
```
to `https://api.pagerduty.com/incidents`. You will need to set the following headers:
 ### Pushover
Send a message using [Pushover](https://pushover.net/) by posting this body:
```json theme={null}
{
"token":"YOUR_SECRET_TOKEN_FROM_PUSHOVER",
"user":"YOUR_USER_FROM_PUSHOVER",
"title":"{{ALERT_TITLE}}",
"html":1,
"priority":2,
"retry":30,
"expire":10800,
"message":"{{ALERT_TYPE}}
### Pushover
Send a message using [Pushover](https://pushover.net/) by posting this body:
```json theme={null}
{
"token":"YOUR_SECRET_TOKEN_FROM_PUSHOVER",
"user":"YOUR_USER_FROM_PUSHOVER",
"title":"{{ALERT_TITLE}}",
"html":1,
"priority":2,
"retry":30,
"expire":10800,
"message":"{{ALERT_TYPE}}
{{STARTED_AT}} ({{RESPONSE_TIME}}ms)
{{RESULT_LINK}}"
}
```
### Trello
You can create a [Trello](https://trello.com) card using just the URL and no payload:
```
https://api.trello.com/1/cards?idList=5b28c04aed47522097be8bc4&key={{TRELLO_KEY}}&token={{TRELLO_TOKEN}}&name={{CHECK_NAME}}
```
### SSL alert
You can send your SSL alerts using webhooks. Using the following body:
```json theme={null}
{
"message": "{{ALERT_TITLE}}",
"link":"{{RESULT_LINK}}"
}
```
Will yield the following output, where we customize the `ALERT_TITLE` to include the domain and the days remaining till your certificate expires.
```json theme={null}
{
"message": "The SSL certificate for api.checklyhq.com will expire in 14 days",
"link": "http://app-test.checklyhq.com/checks/08437f9c-df8c-45ed-975a-a3f9e24d626d"
}
```
### Twilio
You can configure a webhook to POST to a JavaScript snippet running in a [Twilio Function](https://www.twilio.com/docs/runtime/functions). This code receives the Checkly webhook JSON, then triggers a Twilio "Flow execution":
```javascript theme={null}
//"From" is the sender phone number
//"To" is the receiver phone number
exports.handler = async function (context, event, callback) {
const { From, To, Event, Link } = event;
const client = context.getTwilioClient();
try {
const execution = await client.studio.flows(FLOW_SID)
.executions
.create({ to: To, from: From, parameters: { Event, Link } })
console.log(`Created execution ${execution.sid}`);
return callback(null, "OK");
} catch (error) {
return callback(error);
}
};
```
### Jira
A webhook can be used to create a new issue on Jira via the [Jira API](https://developer.atlassian.com/cloud/jira/platform/rest/v3/intro/), for example in the case of a previously passing check that switches to failing state.
We will be creating a POST request to `{{JIRA_INSTANCE_URL}}/rest/api/3/issue`, where the content of your `JIRA_INSTANCE_URL` environment variable would look something like `https://your-jira-instance-name.atlassian.net`.
The required headers will be:
```bash theme={null}
Authorization: Basic
Accept: application/json
Content-Type: application/json
```
For more details on authenticating with the Jira API, refer to [Atlassian's guide on basic authentication](https://developer.atlassian.com/cloud/jira/software/basic-auth-for-rest-apis/).
An example body could look as follows:
```json theme={null}
{
"fields": {
"description": { // your Jira issue description, using Atlassian Document Format (ADF)
"version": 1,
"type": "doc",
"content": [
{
"type": "paragraph",
"content": [
{
"type": "text",
"text": "View check result",
"marks": [
{
"type": "link",
"attrs": {
"href": "{{RESULT_LINK}}"
}
}
]
}
]
}
]
},
"issuetype": {
"id": "10001" // your Jira issue type id
},
"labels": [
"needs_investigation"
],
"priority": { // dynamically set the issue priority, based on the check's tags
"id": {{#contains TAGS "P1"}} "1"
{{else}} {{#contains TAGS "P2"}} "2"
{{else}} {{#contains TAGS "P3"}} "3"
{{else}} {{#contains TAGS "P4"}} "4"
{{else}} {{#contains TAGS "P5"}} "5"
{{else}} "3"
{{/contains}} {{/contains}} {{/contains}} {{/contains}} {{/contains}}
},
"project": {
"key": "ABC" // your Jira project key
},
"summary": "{{ALERT_TITLE}}"
}
}
```
For full details on creating issues via the Jira API, see [Atlassian's documentation for this endpoint](https://developer.atlassian.com/cloud/jira/platform/rest/v3/api-group-issues/#api-rest-api-3-issue-post).
You can also use version 2 of the Jira API (i.e. `{{JIRA_INSTANCE_URL}}/rest/api/2/issue`). The only difference is that version 2 does not support [Atlassian Document Format (ADF)](https://developer.atlassian.com/cloud/jira/platform/apis/document/structure/).